You’re provided a project, and then you’re tasked to ensure each member of your organization follows through with their tasks to get the project done right and on time. From planning ahead to organizing deadlines, there’s a lot to consider for a digital marketer. However, it doesn’t have to be overwhelming. Using an awesome software tool like Asana can help make your project breeze. In this blog post, I’ll walk you through the top tips and tricks for tackling this role full-on from the planning through to execution!
Tip #1: Creating Your Project
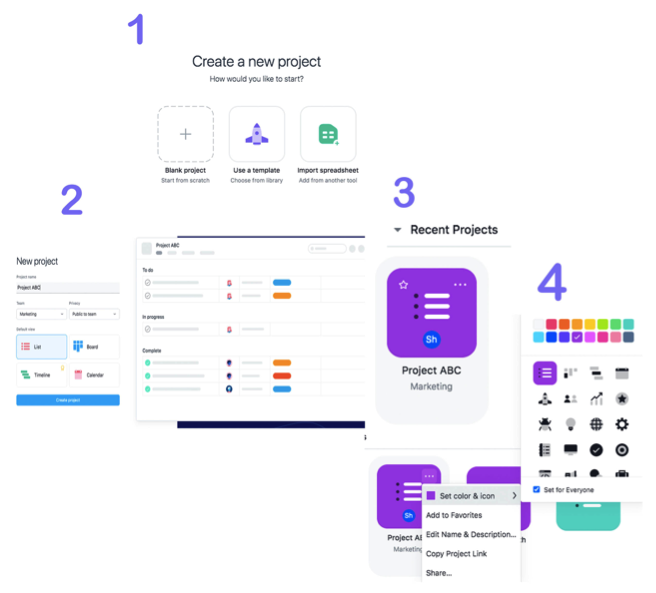
So how do you start creating your project? The first step is selecting the New Project (+) option within your home page, and then complete the steps in the image below. After you’ve finished, you’re off to the races. I would also suggest customizing your project box by selecting a colour and an icon that will distinguish your projects from one another.
Tip #2: Assigning Tasks and Subtasks
Setting up your tasks and subtasks is the next step. This is where you will start communicating with your clients for content information. First, create your sections, and then add tasks underneath. After completing this process, you can assign your client to a specific task. If there’s more than one person in charge, I’d suggest selecting the main person who is overseeing the task. You can assign the rest of your team members within the subtasks section.
Tip #3: Setting Earlier Deadlines
Consider setting your deadlines a day or two before they are actually due. This means fudging your deadline dates a little sooner than expected. There’s nothing more frustrating then when projects go overdue. This little bit of buffer can give you some breathing room should any of your team fall behind on their tasks. Once you set your deadline the team member who is assigned to that specific task will receive an email notification.
After completing the deadlines, you should fill in the description box to provide in-depth details about the task. This helps simplify the process and create transparency for the team members to better understand their tasks and those of others. Additionally, you should use bullet points to highlight any requested information.
Tip #4: Sending Messages in the Comment Box
Now that your project is setup and the tasks assigned Asana has a great tool for ongoing communication. Located inside each task, you will see a comment box appear on the bottom right section of your screen. This section provides an area where you can send direct messages to your client or team members. You can start chatting-it-up with a specific team member by adding the @ sign before their name. This is a great feature because it keeps all communication within Asana.
Dropbox and Google Drive can also be connected to the comment box, which adds to the user experience for project managing.
Tip #5: Keeping Track of Those Deadlines
Waiting last minute for information can feel rather stressful. However, it doesn’t have to be. Asana offers a great option to keep you on the right track with your projects through their calendar view.
For example, when creating a project from scratch (in the blank project section) you can select the calendar view option. This will enable you to have an overall view of all your projects. You can also fill in your notes in the description area when double-clicking on the task within the calendar.
Finally and Lastly
It’s super important to stay on-point and organized when project managing for your clients. Having a software tool like Asana is essential so that information doesn’t slip through the cracks. From creating a project to setting deadlines, you will slowly start to adapt to using the software by piecing everything together one-by-one. Proving to your client that you’re able to take the reins of a project will help build a long-lasting relationship. If you’re new to it, don’t worry. You will learn throughout the process, just remember to keep diligent while at it!
—–
Article Written by:
Sharon Espinal
Content and Digital Marketing Specialist | Digital Marketing Collective


